

Getting started
For a while now I have been focussing a lot on the Azure Integration Services, as well as how to deploy them via YAML based pipelines and BICEP files for Infrastructure as Code. With a background in Data Engineering it is also very interesting to apply these technologies for deploying something most Data engineers use, an SQL Database!
This blog will be an extension to my previous blog in which I explain step-by-step on how to setup a YAML based pipeline for a Dynamic DTAP deployment of your Infrastructure as Code. The use of parameters, loops and more can be found their if any explanation is required.
Let's look at the pipelines!
Build pipeline
The build.yaml is a very straightforward. It contains parameters, for which the values can be adjusted when running the pipeline, especially for the environmentObjects parameter, which contains a JSON like structure with properties. You can remove environmentNames with its corresponding server and database if not applicable to you. With this you can deploy for any of the Environments as you please and add.
Furthermore it will build the Database project as you would normally do in a VS code or otherwise, Copy the files to a local storage and publish the generated .DACPAC as an Artifact which could be picked-up elsewhere.
Last but not least it will loop through the different properties inside of the environmentObjects parameter while calling the deploy.yaml file.
trigger:
- none

name: Build Database

parameters:
- name: environmentObjects
  displayName: Select environments for which to deploy.
  type: object
  default:
    - environmentName: 'DEV'
      server: ''
      database: ''
    - environmentName: 'TST'
      server: ''
      database: ''
    - environmentName: 'ACC'
      server: ''
      database: ''
    - environmentName: 'PRD'
      server: ''
      database: ''

- name: solutionPath
  displayName: Path of the database project.
  type: string
  default: '**/*.sqlproj'

- name: projectName
  displayName: Name of the project (without extentions).
  type: string
  default: 'MyDatabase'

pool:
  vmImage: windows-latest

stages:
- stage: Build
  jobs:
  - job: 'Build_Database'
    steps:
    - task: MSBuild@1
      inputs:
        solution: ${{ parameters.solutionPath }}
        platform: 'any cpu'
        configuration: 'release'
        clean: true

    - task: CopyFiles@2
      displayName: Copy DACPAC
      inputs:
        SourceFolder: '$(Build.SourcesDirectory)/${{ parameters.projectName }}/bin/output'
        Contents: '*.dacpac'
        TargetFolder: '$(Build.ArtifactStagingDirectory)/drop'

    - task: PublishBuildArtifacts@1
      displayName: 'Publish artifact'
      inputs:
        PathtoPublish: '$(Build.ArtifactStagingDirectory)/drop'
        ArtifactName: ${{ parameters.projectName }}
        publishLocation: container


- ${{ each environmentObjects in parameters.environmentObjects }} :
   - template: deploy.yml
     parameters:
       environmentName: ${{ environmentObjects.environmentName }}
       serverName: ${{ environmentObjects.server }}
       databaseName: ${{ environmentObjects.database }}
       projectName: ${{ parameters.projectName }}
Deploy pipeline
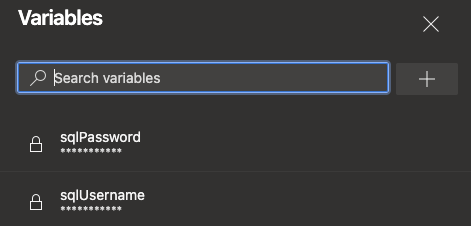
Before we look at the Deploy pipeline it is good to know that I use Variables within it. Of course it would also be possible to use some additional steps to get values from a KeyVault, but since these variables are hashed and can not be viewed afterwards, it should work for most cases. These Variables can be found in the right-top corner of your Azure DevOps pipeline next to the Run button.
You can specify it name and value, hash it by checking the box in-front of Keep this value secret and with that it should be secure for most use cases.

After adding your values, in the case of this pipeline it will be sqlPassword and sqlUsername. You should be good to go!
Now let's look at the build.yaml pipeline, which is also pretty straightforward. It as the same parameters as which we passthrough in the loop from the build.yaml pipeline, but without any default values.
The first job in the stage is not mandatory, but just handy to use as it will ask for approval first before it deploys. Certainly for environments like Acceptance and Productions this comes to use for audibility.
The last job would be the actual deployment to a SQL Server, which also uses the Secret Variables as show above and the Artifact path created in the build pipeline as well as all the other parameters that were passed through.
parameters:
- name: environmentName
  type: string
  default:

- name: serverName
  type: string
  default:

- name: databaseName
  type: string
  default:

- name: projectName
  type: string
  default:

stages:
  - stage: "Deploy_${{ parameters.environmentName }}"
    displayName: Deploy ${{ parameters.environmentName }}
    condition: and(succeeded(), or(eq('${{ parameters.environmentName }}', 'DEV'),eq('${{ parameters.environmentName }}', 'TST'),eq('${{ parameters.environmentName }}', 'ACC'),eq('${{ parameters.environmentName }}', 'PRD')))
    jobs:
    - job: waitForValidation
      displayName: Waiting for approval
      timeoutInMinutes: 1440 # task times out in 1 day
      pool: server
      steps:
        - task: ManualValidation@0
          timeoutInMinutes: 1440 # task times out in 1 day
          inputs:
            instructions: 'Accept or Reject deployment'
            onTimeout: 'reject'

    - job: "Deploy_${{ parameters.databaseName }}"
      steps:
        - task: SqlDacpacDeploymentOnMachineGroup@0
          displayName: ${{ parameters.databaseName }} deploy to ${{ parameters.serverName }}
          inputs:
            DacpacFile: $(Pipeline.Workspace)\drop\${{ parameters.projectName }}.dacpac
            ServerName: ${{ parameters.serverName }}
            DatabaseName: ${{ parameters.databaseName }}
            AuthScheme: sqlServerAuthentication
            TaskType: 'dacpac'
            TargetMethod: 'server'
            SqlUsername: $(sqlUsername)
            SqlPassword: $(sqlPassword)
            AdditionalArguments: # Add arguments you want to supply to your .DACPAC
While the above deploy task is specific to deploying the .DACPAC file to a On-premise SQL Server/ Azure VM with SQL Server, it can be easily be adjusted for an Azure SQL Database. To do so, the following YAML code could be used:
- job: Deploy_${{ parameters.databaseName }}
- task: SqlAzureDacpacDeployment@1
displayName: ${{ parameters.databaseName }} deploy to ${{ parameters.serverName }}
inputs:
azureSubscription: $(azureSubscription)
AuthenticationType: 'server'
ServerName: ${{ parameters.serverName }}
DatabaseName: ${{ parameters.databaseName }}
SqlUsername: $(sqlUsername)
SqlPassword: $(sqlPassword)
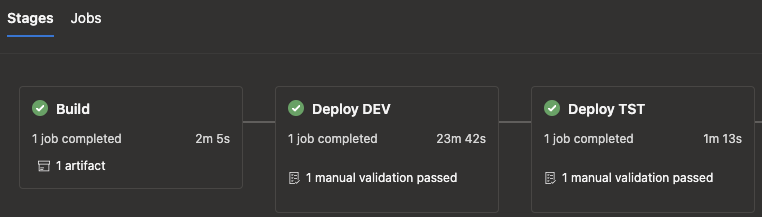
DacpacFile: $(Pipeline.Workspace)\drop\${{ parameters.projectName }}.dacpaAnd if you would run the pipeline for example for a Development and Test environment, you should be greeted with an overview as shown below.
What's next?
To continue on the topic of database I have something very exciting to show in the next blog. Stayed tuned!