

Previously
In my previous blog I showed how to set up a modular way to create an Bicep file for an Azure Logic App. I ended the blog with a snippet of code on how to deploy this to a Development environment via Azure Pipelines with a YAML file.
Oftentimes you would still see each environment stated separately within the YAML itself. This isn't a bad thing, but if you don't have to repeat similar steps when made dynamic, this would always be a preferred way.
So let's look at how this could be accomplished!
Looping through a YAML
First we will need to create a new YAML file. This file will be the one that will be used as the Azure Pipeline within Azure DevOps and will initiate the looping for us.
But we will be needing something to loop through. This we can accomplish by making a parameter with the type: object which functions as an Array. The following code will give an example of what this could look like:
parameters:
- name: environmentNames
  displayName: specify the environments for which the pipeline need to run
  type: object
  default: ['DEV', 'TST', 'ACC', 'PRD']
In this example I will take a Platform-team perspective, which means that the infrastructure written in Biceps only needs to deploy irregularly, which also means we want our YAML to be reusable for every single department we deploy for!
To accomplish this I added 3 more parameters:
- name: departmentName
  type: string
  default: IT

- name: templateFile
  type: string
  default: main.bicep

- name: location
  type: string
  default: westeurope
The above 3 parameters enable us to specify a department, which bicep file we want to deploy and to which location, which is certainly handy within international companies. The only thing left to do now is to specify the loop we wanted to create, which can be done as follows:
stages:
- ${{ each environmentName in parameters.environmentNames }} :
   - template: deploy.yaml
     parameters:

       environmentName: ${{ environmentName}}
       departmentName: ${{ parameters.departmentName }}
       templateFile: ${{ parameters.templateFile }}
       location: ${{ parameters.location }}
Inside the stages we define the loop with the - ${{ each environmentName in parameters.environmentNames }} : which allows us to loop through each environment we have specified in our parameter, in this case DEV, TST, ACC and PRD. Furthermore we will call upon a second YAML file, which contains all the deployment logic, and feed it the necessary parameters to run. For convenience sake, the following code will be the complete YAML:
trigger:
- none

parameters:
- name: environmentNames
  displayName: specify the environments for which the pipeline need to run
  type: object
  default: ['DEV', 'TST', 'ACC', 'PRD']

- name: departmentName
  type: string
  default: IT

- name: templateFile
  type: string
  default: main.bicep

- name: location
  type: string
  default: westeurope

pool:
  vmImage: ubuntu-latest #windows-latest #macOS-latest

stages:
- ${{ each environmentName in parameters.environmentNames }} :
   - template: deploy.yaml
     parameters:

       environmentName: ${{ environmentName}}
       departmentName: ${{ parameters.departmentName }}
       templateFile: ${{ parameters.templateFile }}
       location: ${{ parameters.location }}
When we run the Azure pipeline containing the YAML, you will see something similar to the following:
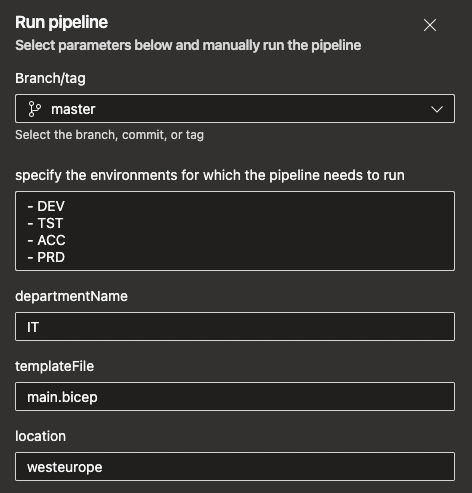
Here you can define every value needed at that moment and you can deploy for what you need at that moment. A good example of this is how this was accomplished within the classic pipelines, for which you could select the environment which you wanted to run. This isn't a thing in YAML, but with the above code you can do it!
deploy.yaml
As we saw in the previously explained code we need a separate YAML file containing all of our deployment logic. While this is very much the same as could be seen in my previous blog, this will be made completely dynamic, so it can deploy every environment we need. To start with this, we need our parameters that need to be fed by the pipeline. For this we can add the same parameters as before but with some empty values:
parameters:
- name: environmentName
  type: string
  default:

- name: departmentName
  type: string
  default:

- name: templateFile
  type: string
  default:

- name: location
  type: string
  default:
As you might have noticed, the environmentName is a type: string now instead of a type: object since it will only house a single value. Besides that, everything will still be the same. Now we will need to specify our stage, which will have to be dynamically ran for each specified environment. But besides naming the stage, we also want to do some validation on the environmentName parameter, since in this case it may only house specific values to keep to our environment naming convention. The following code will do all of that:
stages:
###################################
# Deploy environment
###################################
- stage: "Deploy_${{ parameters.environmentName }}_${{ parameters.departmentName }}"
  displayName: Deploy ${{ parameters.environmentName }} ${{ parameters.departmentName }}
  condition: and(succeeded(), or(eq('${{ parameters.environmentName }}', 'DEV'),eq('${{ parameters.environmentName }}', 'TST'),eq('${{ parameters.environmentName }}', 'ACC'),eq('${{ parameters.environmentName }}', 'PRD')))
Last but certainly not least will be the job itself, which allows us to use the Azure CLI code to deploy our Bicep file. In this piece of code I will also dynamically name the Service Connection based on ResourceGroup. This can be different for you and can be changed accordingly, if needed. The same goes for creating the ResourceGroup itself, to which the services inside the Bicep would be deployed:
  jobs:
  - job: "Deploy_${{ parameters.environmentName }}"
    steps:
    - task: AzureCLI@2
      displayName: 'Deploy Bicep'
      inputs:
        azureSubscription: "AZURE-SC-RG-${{ parameters.departmentName }}-${{ parameters.environmentName }}"
        scriptType: bash
        scriptLocation: inlineScript
        inlineScript: |
          az group create --name "RG-${{ parameters.departmentName }}-${{ parameters.environmentName }}" --location ${{ parameters.location }} --tags 'environment=${{ parameters.environmentName }}' 'department=${{ parameters.departmentName }}'
          az deployment group create --resource-group "RG-${{ parameters.departmentName }}-${{ parameters.environmentName }}" --template-file "CICD/Department/${{ parameters.departmentName }}/${{ parameters.templateFile }}" --parameters environment=${{ parameters.environmentName }}
Other things you might want to adjust accordingly would be the Path to the Bicep file, Tags in the ResourceGroup, and the parameter fed to the Bicep file itself. Again, for convenience sake, here is the whole YAML itself:
parameters:
- name: environmentName
type: string
default:
- name: departmentName
type: string
default:
- name: templateFile
type: string
default:
- name: location
type: string
default:
stages:
###################################
# Deploy environment
###################################
- stage: "Deploy_${{ parameters.environmentName }}_${{ parameters.departmentName }}"
displayName: Deploy ${{ parameters.environmentName }} ${{ parameters.departmentName }}
condition: and(succeeded(), or(eq('${{ parameters.environmentName }}', 'DEV'),eq('${{ parameters.environmentName }}', 'TST'),eq('${{ parameters.environmentName }}', 'ACC'),eq('${{ parameters.environmentName }}', 'PRD')))
jobs:
- job: "Deploy_${{ parameters.environmentName }}"
steps:
- task: AzureCLI@2
displayName: 'Deploy Bicep'
inputs:
azureSubscription: "AZURE-SC-RG-${{ parameters.departmentName }}-${{ parameters.environmentName }}"
scriptType: bash
scriptLocation: inlineScript
inlineScript: |
az group create --name "RG-${{ parameters.departmentName }}-${{ parameters.environmentName }}" --location ${{ parameters.location }} --tags 'environment=${{ parameters.environmentName }}' 'department=${{ parameters.departmentName }}'
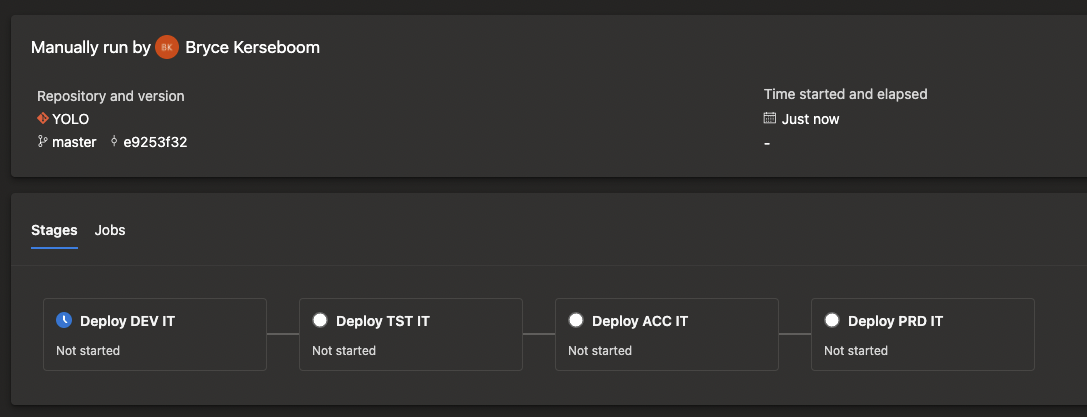
az deployment group create --resource-group "RG-${{ parameters.departmentName }}-${{ parameters.environmentName }}" --template-file "CICD/Department/${{ parameters.departmentName }}/${{ parameters.templateFile }}" --parameters environment=${{ parameters.environmentName }}When running the whole pipeline you will get something similar to the following:
What's next?
In recent meetings with Microsoft I was notified that the Microsoft Partner Network is going to change in terms of how a Microsoft Partner is being defined. I'll dedicate my next blog on how this will work and how to keep your partner status!