

Previously
In my previous two blogs of this month, I talked about getting an overview of your ACLs and how to use MSI for the Microsoft graph, both using Azure Logic Apps as the service of choice.
In this blog I'll show how to use the MSI from the previous blog to get a similar result as with the ACL overview, but now for RBAC in your Azure Storage Containers. It is, however, good to know that if you change the HTTPS request calling the Azure Storage account to a different Azure service, for example a Virtual machine or Database, it will also work!
NOTE: To follow this blog step by step, please read the previously mentioned blogs about how to do the configurations, since those will be used in this blog as well.
Another thing that is necessary for reading the RBACs from your services, is that your Logic App needs to have the Reader role on that specific service.
Creating the Logic App
After creating the Logic App as a service, you can click on Create blank to start the Logic App from scratch.
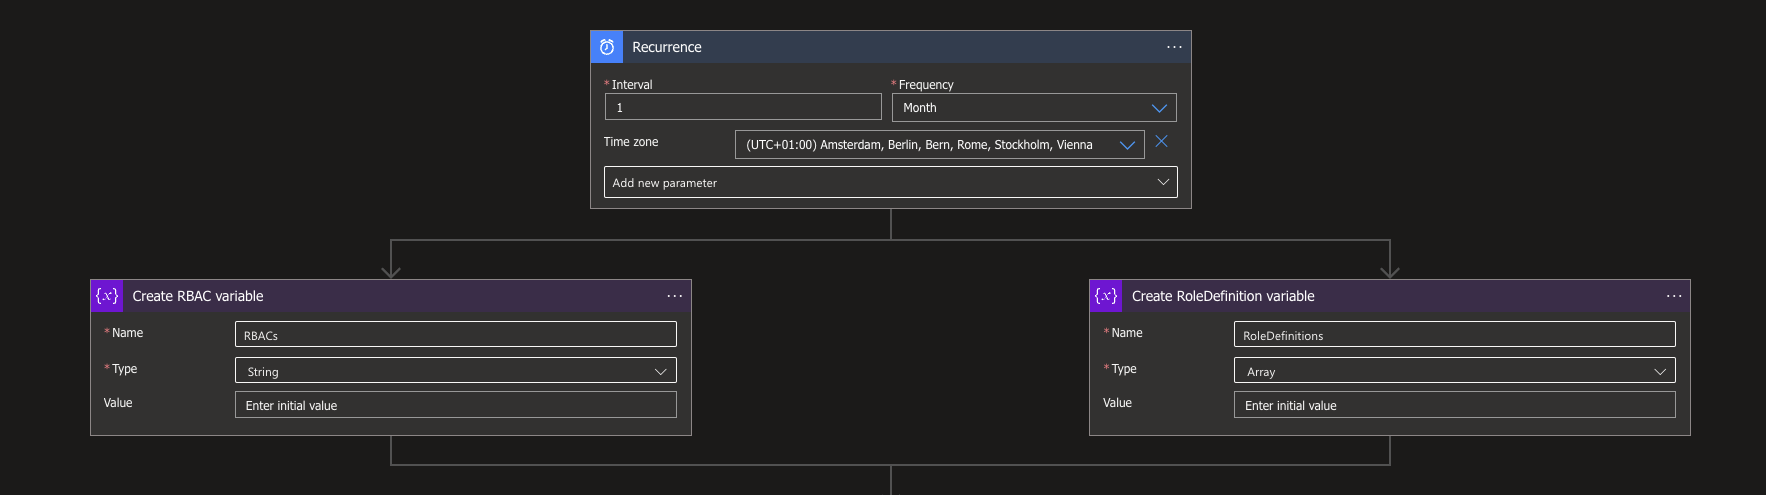
A trigger will need to be defined. For this example, I'll be using a Recurrence, since it only has to run once a month. You can find the Recurrence trigger by searching for the Schedule connector.
When clicking on the Add new parameter, you will be able to select a Time zone and a Startdate if required. I added the Time zone to make a clear difference between UTC time, which is used by default and the time zone I'm personally in, namely UTC+1.
With a trigger in place, we will need 2 variables in which to store multiple values for the different For Each activities. One will be to hold all the RBACs for the containers, for which we use a string (since it will need string modifications later on), and the other will be used for the different role definitions, such as Contributor, Storage Blob reader, etc. This will be an array holding different JSON objects.
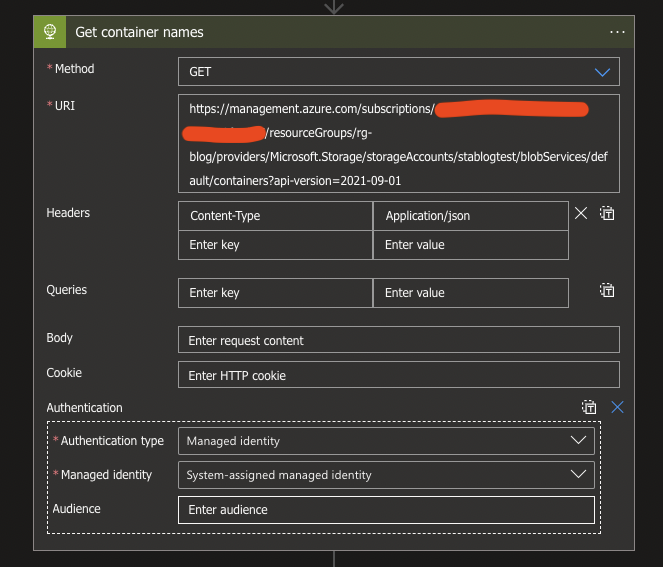
With the basics in place we can make a new action, search for HTTP connector and select the HTTP action. With this HTTP request we will be looking for all the available containers. Use the following options:
Method: GET
Header: Content-Type | application/json
Click on the Add new parameter and select Authentication.
Authentication type: Managed identity
Managed identity: System-assigned managed identity
With the Reader role in place for you Logic App you get a list of all the different containers within your Azure Storage Account.
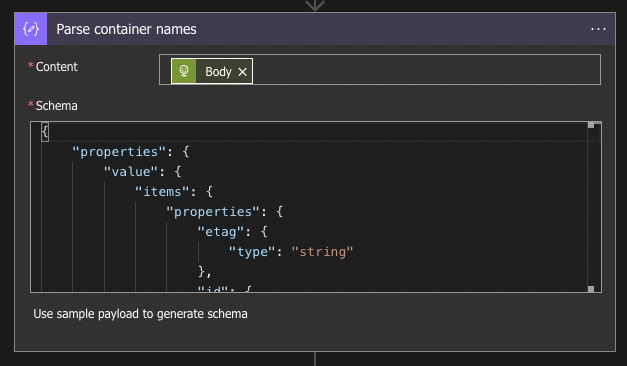
To further use the container information, which contains the names, we want to make using these names easily accessible. For this, you can search for the Data Operations connector and select the Parse JSON Action.
For the content, you use the output from the Body of the HTTP request, and for the schema, you can use the following code:
{
    "properties": {
        "value": {
            "items": {
                "properties": {
                    "etag": {
                        "type": "string"
                    },
                    "id": {
                        "type": "string"
                    },
                    "name": {
                        "type": "string"
                    },
                    "properties": {
                        "properties": {
                            "defaultEncryptionScope": {
                                "type": "string"
                            },
                            "deleted": {
                                "type": "boolean"
                            },
                            "denyEncryptionScopeOverride": {
                                "type": "boolean"
                            },
                            "hasImmutabilityPolicy": {
                                "type": "boolean"
                            },
                            "hasLegalHold": {
                                "type": "boolean"
                            },
                            "immutableStorageWithVersioning": {
                                "properties": {
                                    "enabled": {
                                        "type": "boolean"
                                    }
                                },
                                "type": "object"
                            },
                            "lastModifiedTime": {
                                "type": "string"
                            },
                            "leaseState": {
                                "type": "string"
                            },
                            "leaseStatus": {
                                "type": "string"
                            },
                            "publicAccess": {
                                "type": "string"
                            },
                            "remainingRetentionDays": {
                                "type": "integer"
                            }
                        },
                        "type": "object"
                    },
                    "type": {
                        "type": "string"
                    }
                },
                "required": [
                    "id",
                    "name",
                    "type",
                    "etag",
                    "properties"
                ],
                "type": "object"
            },
            "type": "array"
        }
    },
    "type": "object"
}
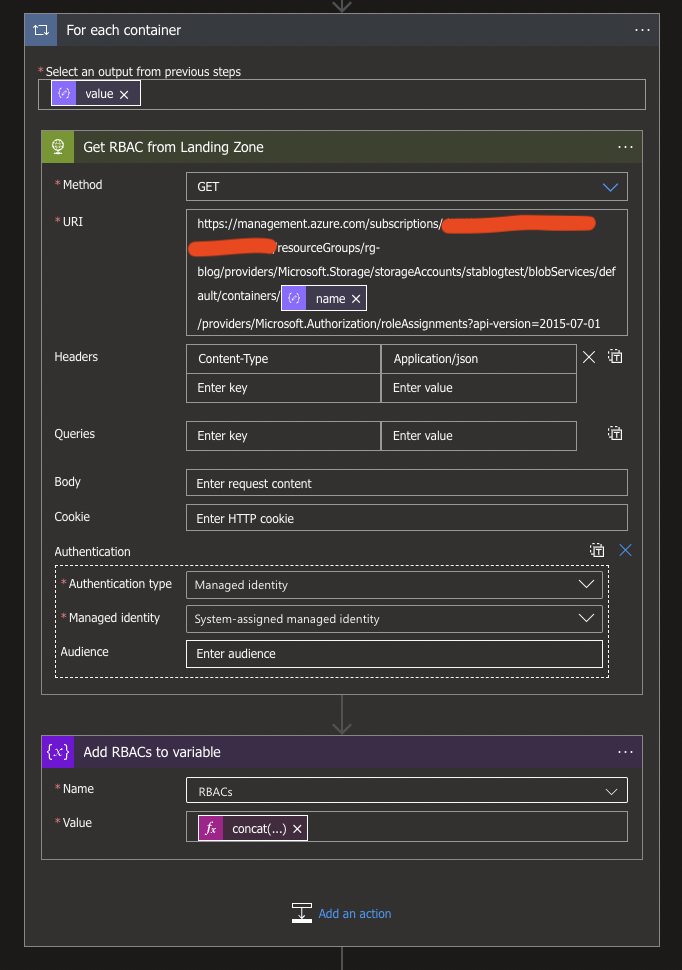
Now that we are able to select individual properties, we can create a new HTTP request action with the following options:
Method: GET
Header: Content-Type | application/json
Click on the Add new parameter and select Authentication.
Authentication type: Managed identity
Managed identity: System-assigned managed identity
Since we use the @{items('For_each_container')?['name']} within the URI, the Logic App will automatically create a For Each loop around the HTTP Request, and we can continue by creating an Append to string variable action.
Choose the RBACs variable at the requested Name and use the following Dynamic expression as value:
concat('{',replace(replace(replace(string(body('Get_RBAC_from_Landing_Zone')),'{"value":[{',''),']}',''),'"properties"',concat('"container":"',items('For_each_container')?['name'],'","properties"')))
While it looks a bit dirty with the different replaces in it, it was the easiest way to add the container name to the output per loop.
Below and outside the For Each loop, create a new Data Operation action called Compose. The Compose operation will be used to modify the String from the RBACs variable to recreate a proper JSON Object. For this, you can use the following Dynamic Expression:
json(concat('{"value":[',replace(variables('RBACs'),'}{','},{'),']}'))

Once again, we want to make the properties accessible for the ease of use by using a Data Operation Parse JSON, with the Output from the the Compose as Content, and the Schema will be as follows:
{
    "properties": {
        "value": {
            "items": {
                "properties": {
                    "container": {
                        "type": "string"
                    },
                    "id": {
                        "type": "string"
                    },
                    "name": {
                        "type": "string"
                    },
                    "properties": {
                        "properties": {
                            "createdBy": {
                                "type": "string"
                            },
                            "createdOn": {
                                "type": "string"
                            },
                            "principalId": {
                                "type": "string"
                            },
                            "roleDefinitionId": {
                                "type": "string"
                            },
                            "scope": {
                                "type": "string"
                            },
                            "updatedBy": {
                                "type": "string"
                            },
                            "updatedOn": {
                                "type": "string"
                            }
                        },
                        "type": "object"
                    },
                    "type": {
                        "type": "string"
                    }
                },
                "required": [
                    "container",
                    "properties",
                    "id",
                    "type",
                    "name"
                ],
                "type": "object"
            },
            "type": "array"
        }
    },
    "type": "object"
}
At this point, we know all the RBACs per container, but as you will see when looking at the Data itself, all users, groups, services (MSIs) and roles are GUIDs and are still not very readable. To fix this we will have to do a few more HTTP calls and loops.
To start with, we'll create a new HTTP request action containing the following options:
Method: GET
Header: Content-Type | application/json
Click on the Add new parameter and select Authentication.
Authentication type: Managed identity
Managed identity: System-assigned managed identity
Once again a For Each loop will be created around the HTTP request since we use the property roleDefinitionId via @{items('For_each_roleDefinitionId_')?['properties']?['roleDefinitionId']}.
Here, too, we will need to gather all the different values per loop and need to create an Append to Array variable action for the variable RoleDefinitions, for which we also use the Body of the HTTP Request as value.
Again, all the different objects in the Array of the variable need to become one big JSON object, and we will need another Data Operation Compose action with the following input:
{
  "values": @{variables('RoleDefinitions')}
}
The properties from this combined JSON also need to become accessible, and a Data Operation Parse JSON will be needed again. Use the Outputs from the Compose for the Content, and use the following code and as Schema:
{
    "properties": {
        "values": {
            "items": {
                "properties": {
                    "id": {
                        "type": "string"
                    },
                    "name": {
                        "type": "string"
                    },
                    "properties": {
                        "properties": {
                            "assignableScopes": {
                                "items": {
                                    "type": "string"
                                },
                                "type": "array"
                            },
                            "createdBy": {},
                            "createdOn": {
                                "type": "string"
                            },
                            "description": {
                                "type": "string"
                            },
                            "permissions": {
                                "items": {
                                    "properties": {
                                        "actions": {
                                            "items": {
                                                "type": "string"
                                            },
                                            "type": "array"
                                        },
                                        "notActions": {
                                            "items": {
                                                "type": "string"
                                            },
                                            "type": "array"
                                        }
                                    },
                                    "required": [
                                        "actions",
                                        "notActions"
                                    ],
                                    "type": "object"
                                },
                                "type": "array"
                            },
                            "roleName": {
                                "type": "string"
                            },
                            "type": {
                                "type": "string"
                            },
                            "updatedBy": {},
                            "updatedOn": {
                                "type": "string"
                            }
                        },
                        "type": "object"
                    },
                    "type": {
                        "type": "string"
                    }
                },
                "required": [
                    "properties",
                    "id",
                    "type",
                    "name"
                ],
                "type": "object"
            },
            "type": "array"
        }
    },
    "type": "object"
}
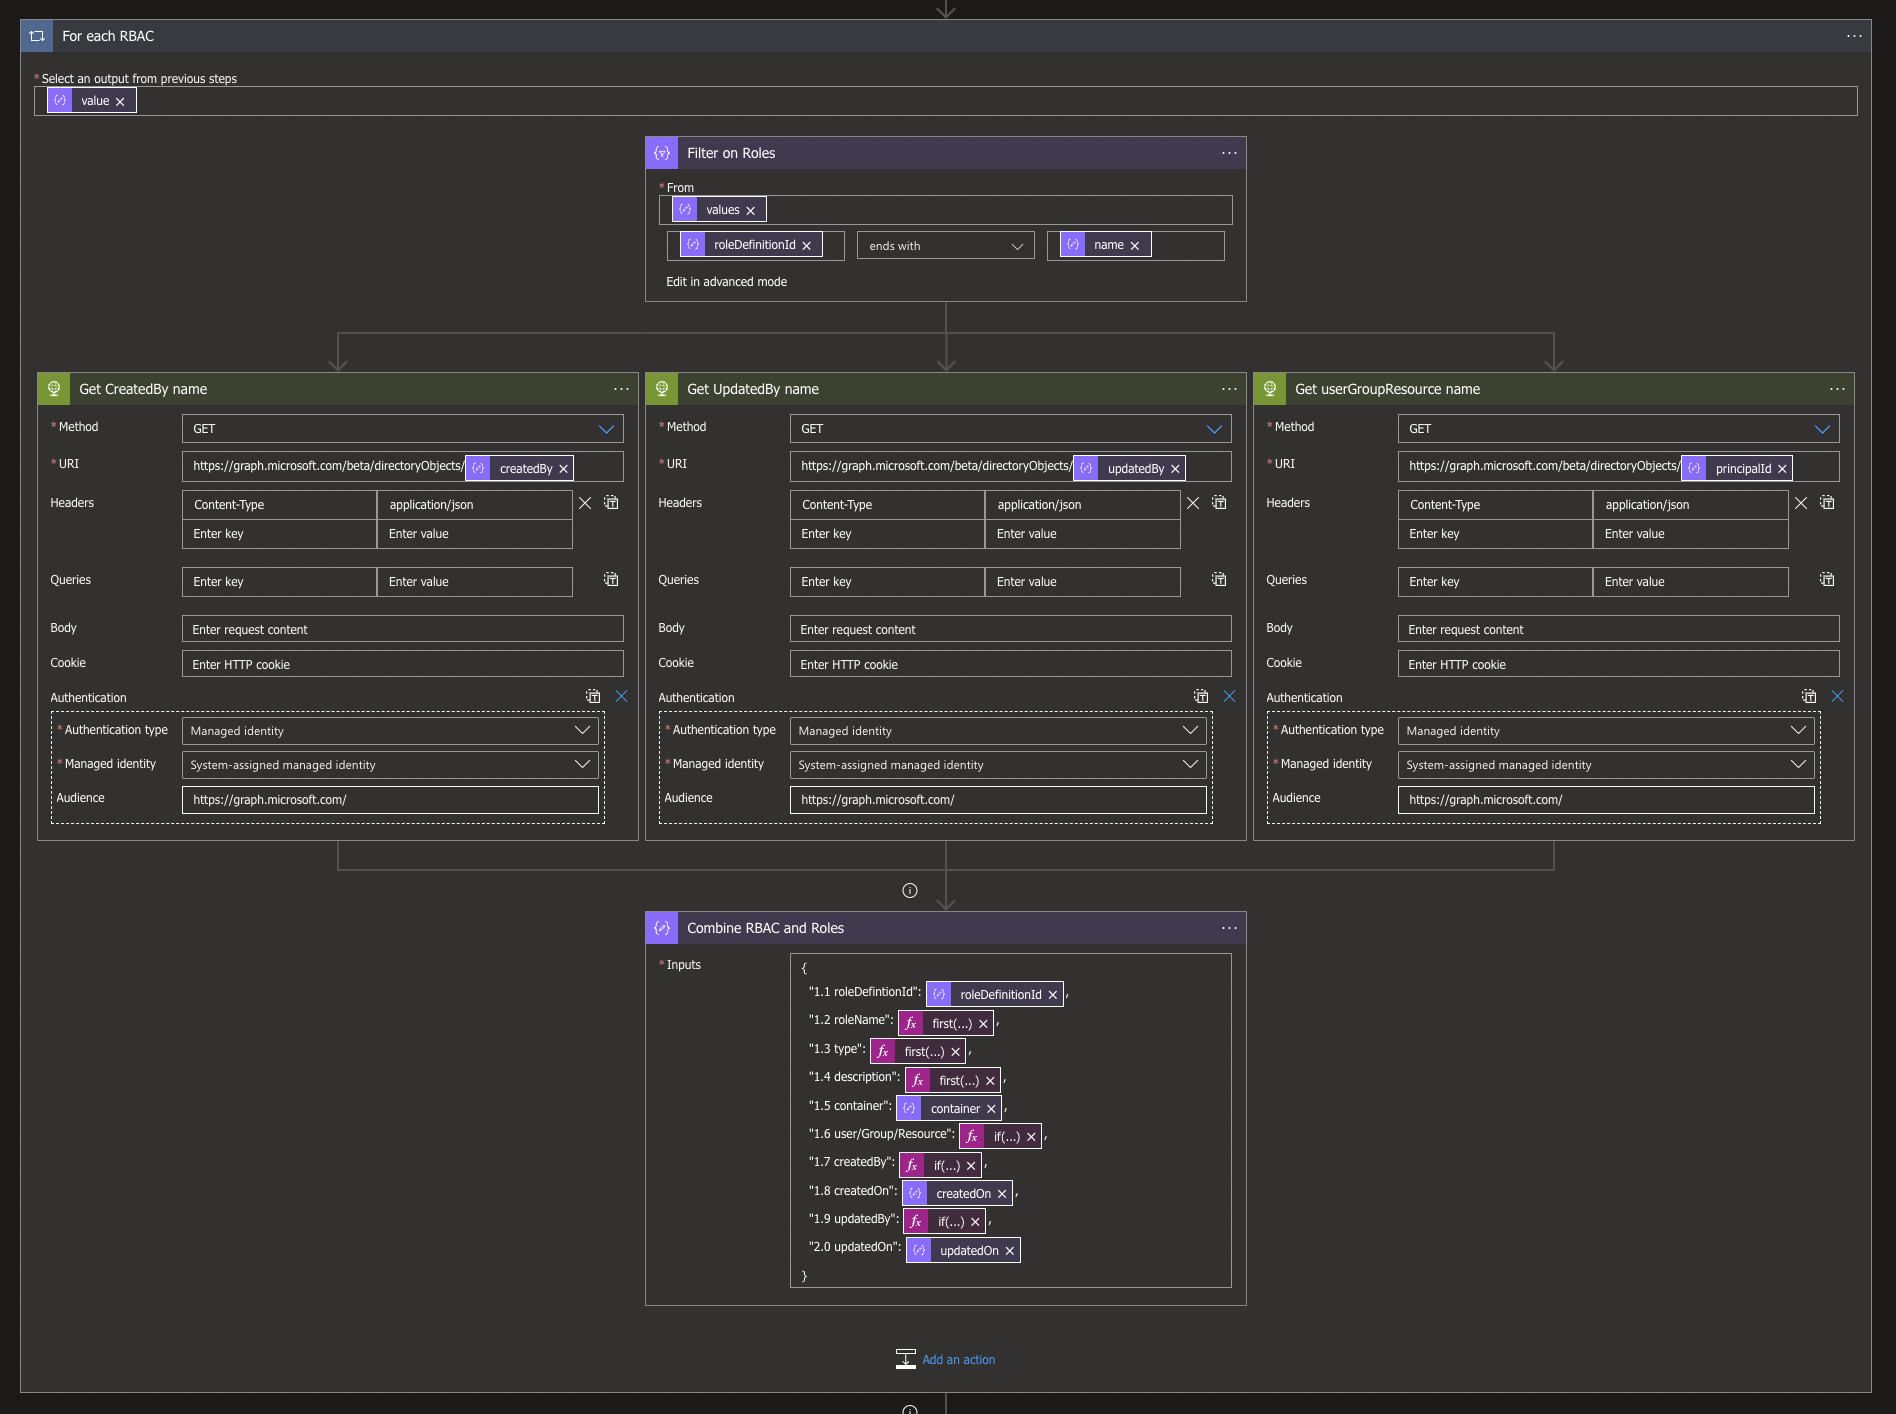
Not really rocket science till now, but we now need to combine all the previous steps and transform the users, groups or resources from GUIDs to readable names.
For now, we will make our For Each loop ourselves by searching for the Control connector and choosing the For Each action.
The Value for the For Each will be based on the output of the Parse RBACs action, which can be easily added with the following code: @body('Parse_RBACs_')?['value']
Furthermore, we will need to filter based on roleDefinitionIds between the RBACs and RoleDefinition Objects we created earlier. This, we can do by searching for the Data Operation called Filter Array. When selecting the action we need to fill in a From, which will be the values from the Parse Combined action. The following code can be used for this: @body('Parse_combined')?['values']
Switch the Filter Array to Edit in advanced mode and use the following code for the filtering: @endswith(items('For_each_RBAC')?['properties']?['roleDefinitionId'], item()?['name']), which allows you to match the RBACs with the RoleDefinitions.
Now that we have matched the JSONs together and we know what belongs together, we still need to translate the GUIDs to readable users, groups or services, for which we create 3 parallel HTTP requests to the Microsoft Graph via MSI, as specified in my previous blog. Use the following options:
Method: GET
Header: Content-Type | application/json
Click on the Add new parameter and select Authentication.
Authentication type: Managed identity
Managed identity: System-assigned managed identity
Audience: https://graph.microsoft.com/
If your MSI is set as specified for the Microsoft Graph you will be set and it will only be a matter of structuring the new JSON object.
For this, we use a Data Operation Compose action, again with the following code:
{
  "1.1 roleDefintionId": @{items('For_each_RBAC')?['properties']?['roleDefinitionId']},
  "1.2 roleName": @{first(body('Filter_on_Roles'))?['properties']?['roleName']},
  "1.3 type": @{first(body('Filter_on_Roles'))?['properties']?['type']},
  "1.4 description": @{first(body('Filter_on_Roles'))?['properties']?['description']},
  "1.5 container": @{items('For_each_RBAC')?['container']},
  "1.6 user/Group/Resource": @{if(equals(body('Get_userGroupResource_name')?['displayname'],null),concat('unknown AD object: ',items('For_each_RBAC')?['properties']?['principalId']),body('Get_userGroupResource_name')?['displayname']) },
  "1.7 createdBy": @{if(equals(body('Get_CreatedBy_name')?['displayname'],null),concat('unknown AD Object: ',items('For_each_RBAC')?['properties']?['createdBy']),body('Get_CreatedBy_name')?['displayname'])},
  "1.8 createdOn": @{items('For_each_RBAC')?['properties']?['createdOn']},
  "1.9 updatedBy": @{if(equals(body('Get_UpdatedBy_name')?['displayname'],null),concat('unknown AD Object: ',items('For_each_RBAC')?['properties']?['updatedBy']),body('Get_UpdatedBy_name')?['displayname'])},
  "2.0 updatedOn": @{items('For_each_RBAC')?['properties']?['updatedOn']}
}
Perform a bit of error handling in this code if something can't be found within the Azure AD, as well as getting the some values without creating a For Each per property by using the Dynamic Expression called: First().
Like in the previous blog, I use the numbers to keep the properties in the order I need them to be, since JSON automatically reorders on alphabetical order.
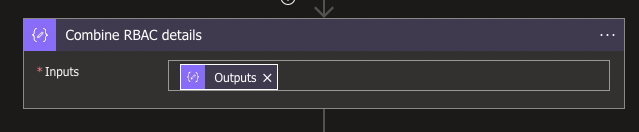
With this For Each loop in place we got all the data structured as we need for our reporting purposes and can start with combining each value per loop, make a CSV table and save both the JSON and the CSV output to our Data Lake.
Create a Data Operation Compose with the following code as values: @{outputs('Combine_RBAC_and_Roles')}. You won't be able to select this yourself, so this needs to be written manually (or copy-pasted from here).
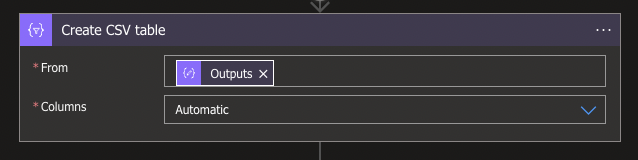
With the full results now properly structured together in one JSON Object, we can add a Data Operation Create CSV table with the From specified by the Output from the Compose.
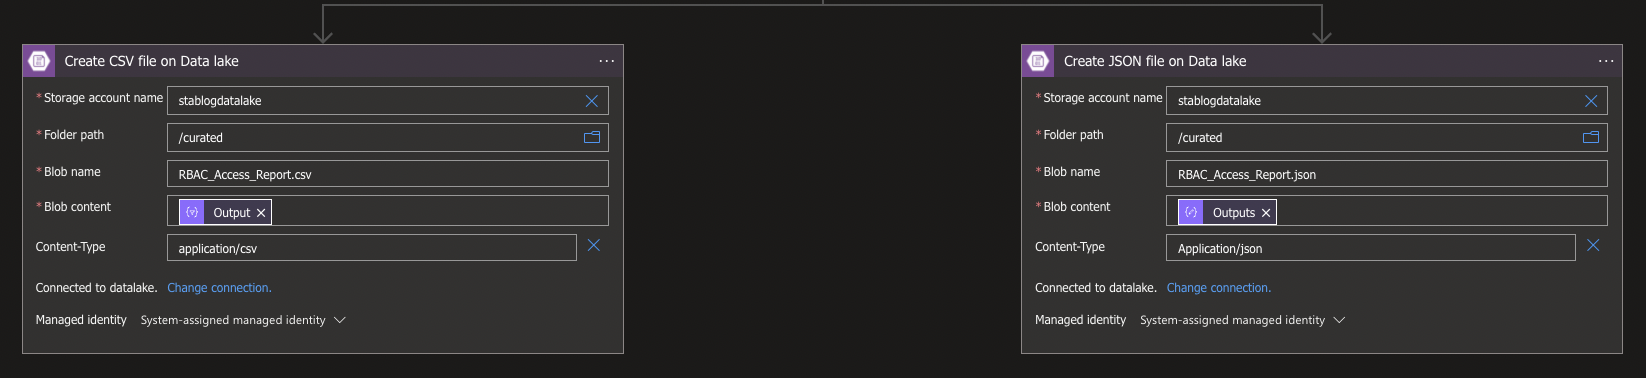
And the only thing left is too drop the data to our Curated layer within the Data Lake for both the JSON and CSV file.
Setup the connection via MSI when asked to configure and use the following options:
Storage account name: Your Data lake/ Storage Account name
Folder path: Container or folder where you want to store it
Blob name: YourFileName.json or YourFileName.csv
Blob content: Output from the Compose
Via the Add a parameter option, you can add Content-Type, in which you can specify application/json to make sure it will be seen as a JSON file, or application/csv for a CSV file.
With this, the Logic App is done. You will be able to read all the RBACs from your containers in your Azure storage account and save them on your Azure Data Lake. As stated, you can easily replace some parts or remove them, such as getting the container names and only looking for one specific Azure Service to get all the RBACs from it, or do something else, but the Logic App will generally remain the same.
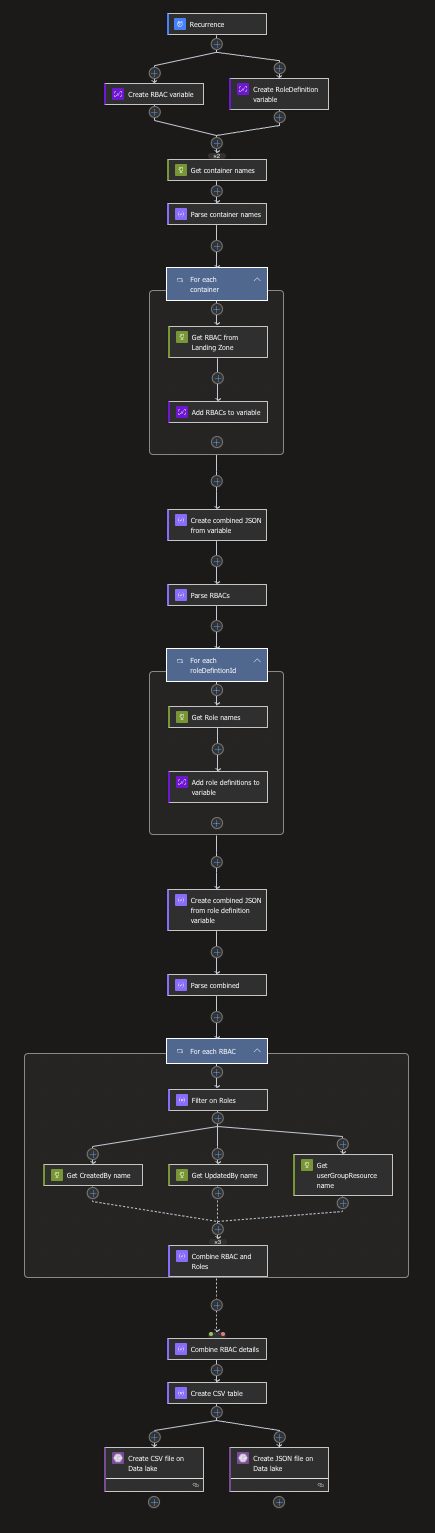
Everything together should now look like this (In new Canvas mode):
What's next?
I will be busy the coming days with multiple events, one of which is the Dutch MCT Community event, which will be hosted later today, as well as some events for personal relaxation. Stay tuned for next week and be surprised by the topic!