

Getting started
This week I encountered a request for a solution for some security checks on the Azure Data lake Gen2 Access Control Lists (ACLs). While the initial solution was hinted towards a powershell script, I opted for an easier solution with Azure Logic Apps. In this blog I'll take you through the creation step by step, so let's get started!
NOTE: In this example I will assume you already have an Azure Data lake Gen2 (Azure storage account with hierarchical namespacing) and know how to create an Azure Logic App via the Azure portal or your favorite infrastructure as codeway.
In this example I'll show everything via the portal.
Configuration
Let's have a quick look at all the configuration that needs to happen before the logic app will work.
NOTE: You will need to have sufficient access rights to do these configurations in the portal.
Logic App
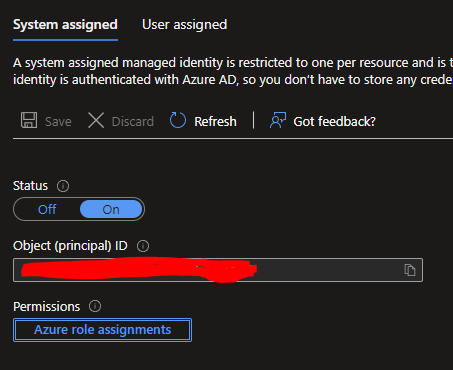
Before we get to creating all the logic, the logic app needs to be configured with a Managed Service Identity (MSI), which should also be added to the Data lake with the Storage Blob Data Contributor role.
When in the Portal, go to Identity, which is under Settings in the blade, and change the Status to ON, then hit Save to apply the changes. The Logic app will now get an ID assigned to it.
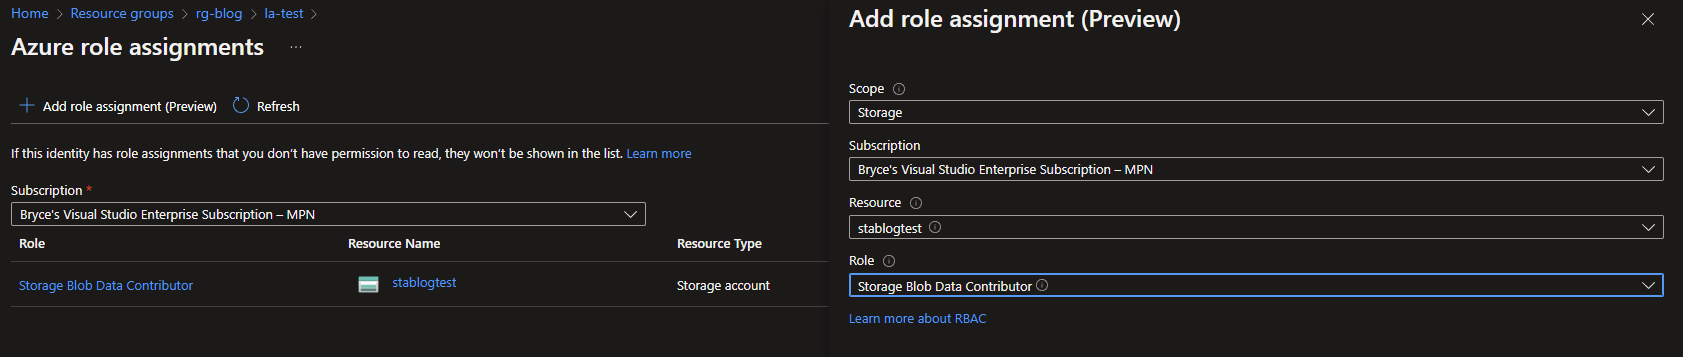
With the new preview functionality you will be able to directly configure the role assignments of the Logic App itself by clicking on the Azure role assignments button.
In the new Azure role assignments screen, click on + Add role assignment (preview) and choose the following options:
Scope: Storage
Subscription: Your subscription
Resource: Your Data lake/ Storage account
Role: Storage Blob Contributor
When configured, hit Save at the bottom of the screen and the new role should be in the list.
Data lake
Move to the Data lake resource and click on Access Control (IAM) in the blade, and then continue to the tab Role assignments. You should be able to verify that your logic app was added.

If role assignment is in place, it is also necessary to actually have some folders and files within your data lake. While this might already apply to you, it didn't for me, and so for this example I created a list of dummy folders.

Getting the Logic in the Logic App!
Back to the Logic App where all the magic is going to happen. Click on the Create blank to start the Logic App from scratch. For this first part, we want to get the trigger, variables and data lake paths ready to continue with.
The basics
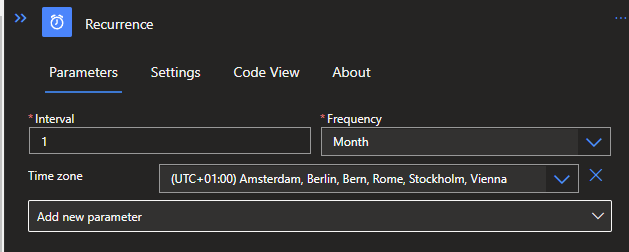
To start with, a trigger will need to be defined. In this example I'll be using a Recurrence, since it only has to run once a month. You can find the Recurrence trigger by searching for the Schedule connector.
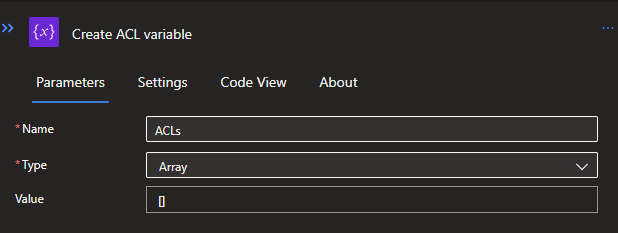
To provide both a .JSON and .CSV file as a result from the Logic App, we will need two variables in which to store increments for both files, since we will be working with a For Each later on.
Click on the + icon below the Recurrence to define an action by clicking on Add an action. Search for variables and select the Initialize variable. Give the variable a proper name so you know that this first variable will be for storing the JSONs in an Array.
Repeat this step, but now click on Add a Parallel branch. This will make sure that both variables will be initialized at the same time. The second variable will also be an Array and will store all the CSV data.
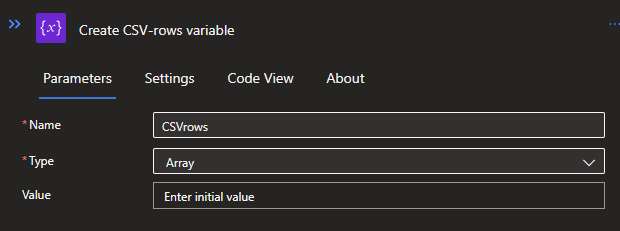
After creating the parallel variables you will get the option to create a new action via the + icons. Choose the center bottom one, this allows both variables to be accessible in all the future steps below.

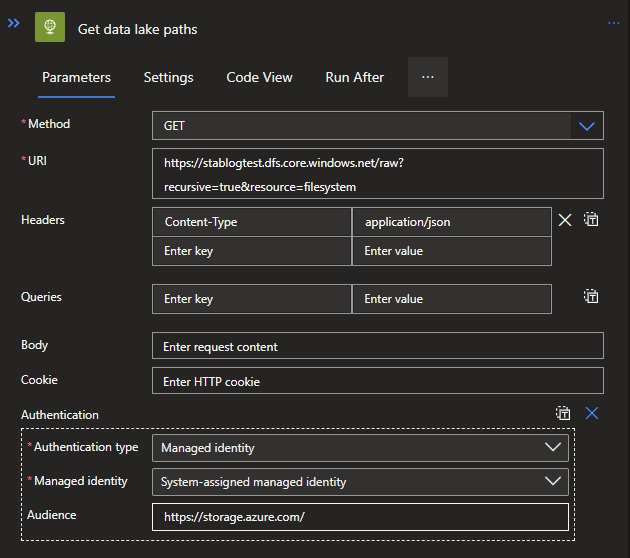
For this new action, search for HTTP connector and select the HTTP action. With this HTTP request we will be looking for all the paths available in our Data lake. Use the following options:
Method: GET
URI: https://{name of your data lake}.dfs.core.windows.net/{Name of the container}?recursive=true&resource=filesystem
Header: Content-Type | application/json
Click on the Add new parameter and select Authentication.
Authentication type: Managed identity
Managed identity: System-assigned managed identity
Audience: https://storage.azure.com/
If you want to filter on more specific paths or something else, you can look Here for more details.
To give a clearer picture of what it will actually retrieve, you can check out the example below:

For Each loop (JSON part)
With the basics in place, we can now move on to the For Each loop and get all the property info about the Data lake paths, especially the ACLs. I will show all the steps, firstly for the JSON part, after which we can go back and add the CSV part as well.
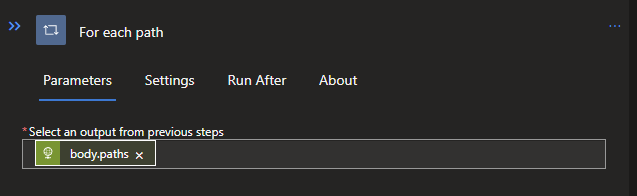
Click on the + below the HTTP and search for control, click on it and select the For Each option. We will need to define a value to loop through, and the basic options provided to us will not work, since we only want the paths. We can solve this with some custom code:
@body('Get_data_lake_paths')['body']['paths']
This code will only grab the paths array as shown in the results example of the HTTP request.
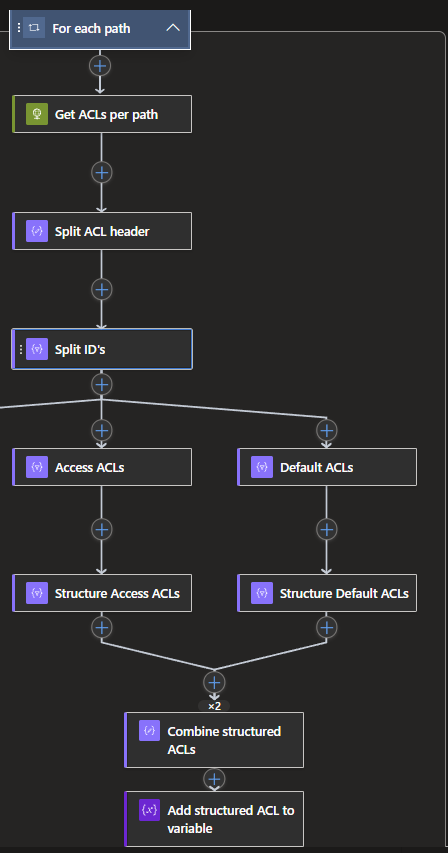
With the For Each in place, interacting over the paths, we can go do something with these paths. So let's get the ACLs for each of them.
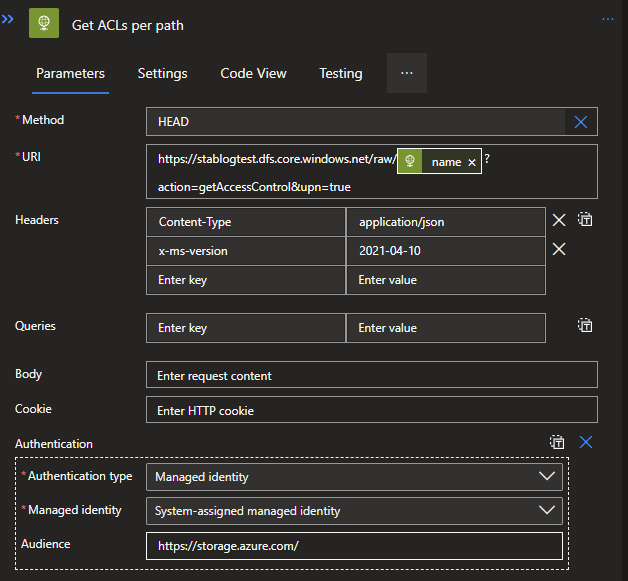
This we can do by creating another HTTP request, which will require some more customization than the previous one. Let's look at the options needed:
Method: HEAD (This will need to be a custom value)
URI: https://{name of your data lake}.dfs.core.windows.net/{Name of the container}/@{items('For_each_path')?['name']}?action=getAccessControl&upn=true
Header 1: Content-Type | application/json
Header 2: x-ms-version | 2021-04-10
Click on the Add new parameter and select Authentication.
Authentication type: Managed identity
Managed identity: System-assigned managed identity
Audience: https://storage.azure.com
For more detailed information about all the options you can look Here.
One of the results from this HTTP request is the Header, called: x-ms-acl, which contains a string of all users, groups and others who have rights on these paths. Unfortunately, this string is not very useful and most logic in this app will be to clean this up.

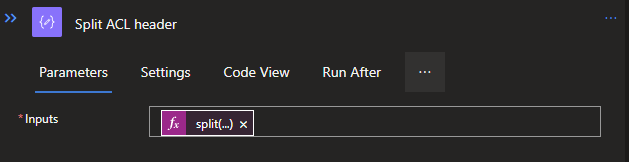
To clean this up, let's start with making it a bit more of a readable format. Create a new action below the HTTP request, and search for Data operation and select the Compose option.
The compose will be used to format a bit differently by splitting the headers first. For this, a Dynamic expression is used with the following code:
split(outputs('Get_ACLs_per_path').headers['x-ms-acl'], ',')
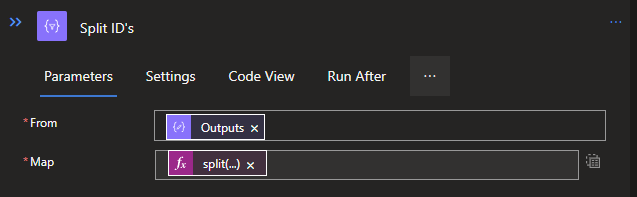
Now that we have split the data from the x-ms-acl header, we need to split it once more to create separate selectable objects from it. This we do by creating another Data operation called Select. When you created the select, you can use the Outputs from the Compose above it as a From/input. We also need to add a mapping, for which we use the following code:
split(item(), ':')
With this code we split the string again, creating separate items to use later on.
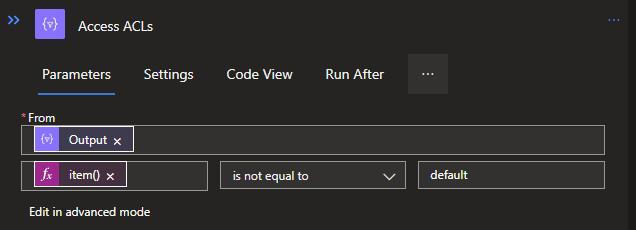
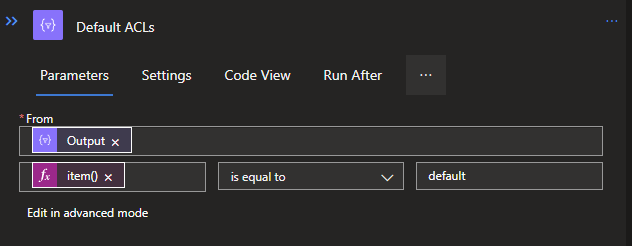
To continue, we will need to make a proper difference between the two types of ACLs: the Access and Default variants. For this we will use parallel branching again, so that both variants will be structured at the same time.
Start with creating another Data operation called Filter Array. You can do this twice as parallel branches, since we need them for both Access and Default ACLs.
We use the Output from the Select above it for both, but the Dynamic expressions will be a little bit different.
Access will be: @not(equals(item()[0], 'default'))
Default will be: @equals(item()[0], 'default')
These codes can be added to the Filter Arrays via the Edit in Advanced mode option, which allows you to add code to it. If you switch back to Basic mode afterwards, you will see it as shown below:
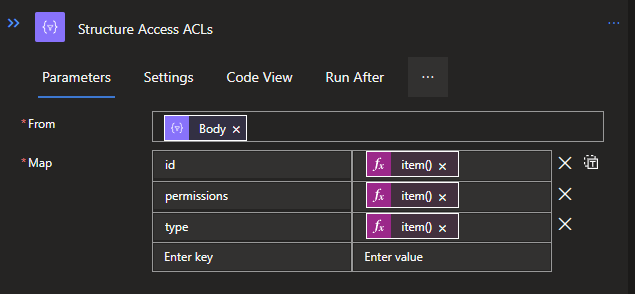
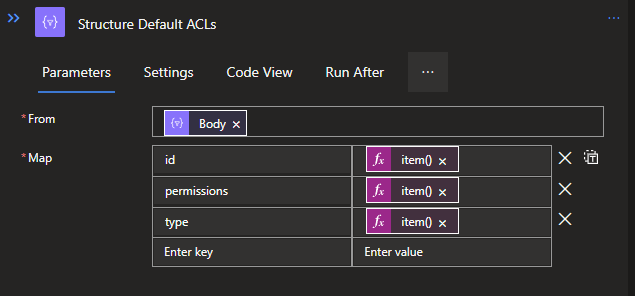
Now we have the branching and filtering of data in place, we can structure both ACL types to make it a JSON and thus more readable.
Create another Select Data operation below each Filter Arrays. Both will do the same structuring, but the items are a bit misaligned due to the fact that the Default ACL has the property Default with it, giving it 4 properties in total, instead of the 3 from the Access ACL.
Access will be:
{
  "id": @{item()[1]},
  "permissions": @{item()[2]},
  "type": @{item()[0]}
}
Default will be:
{
  "id": @{item()[2]},
  "permissions": @{item()[3]},
  "type": @{item()[1]}
}
Both codes can be pasted when switching to the Text mode in the Select.
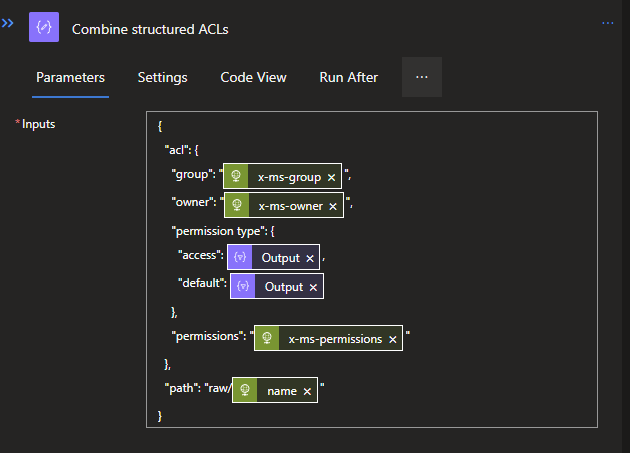
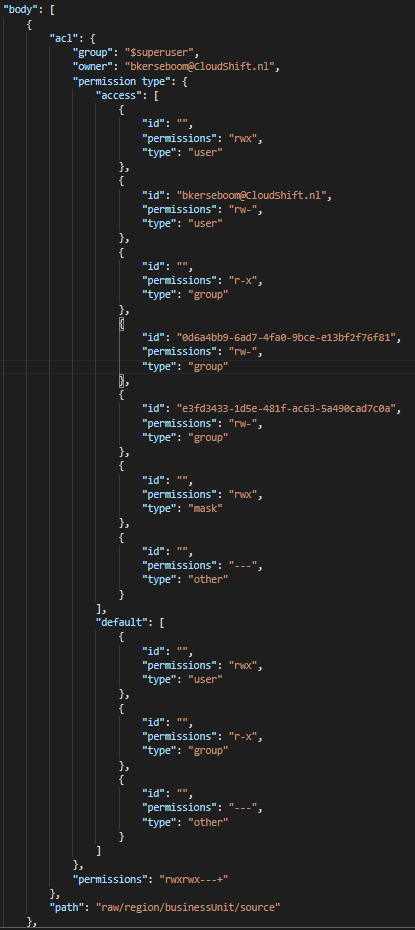
With both ACL variants structured in JSON objects, they will need to be combined to one larger JSON object that will contain the data that needs to be reported on. For this we will use a Compose Data operation again. This action will need variables from both branches. To do this, create the Compose by select the center bottom +. When created, the following code can be used:
{
  "acl": {
    "group": "@{outputs('Get_ACLs_per_path')['headers']['x-ms-group']}",
    "owner": "@{outputs('Get_ACLs_per_path')['headers']['x-ms-owner']}",
    "permission type": {
      "access": @{body('Structure_Access_ACLs')},
      "default": @{body('Structure_Default_ACLs')}
    },
    "permissions": "@{outputs('Get_ACLs_per_path')['headers']['x-ms-permissions']}"
  },
  "path": "raw/@{items('For_each_path')?['name']}"
}
If you've used different naming for your previous actions, you will need to change these accordingly.
To carry this completed JSON object outside of the For Each loop, we will need to add it to the previously created Array variable for the JSON. This can simply be done by creating a new action below the Compose and searching for variables, and then selecting the Append to array variable. This will allow you to add multiple objects to the array, such as each individual JSON per interaction of the For each loop.
Use the Output from the Compose as Value.
Saving to the Data lake (JSON part)
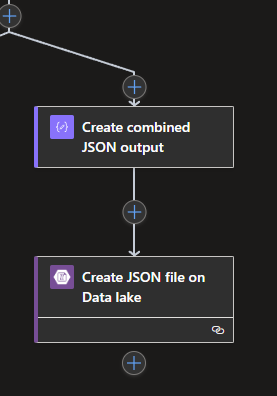
Now we got the For Each done, which leaves us to create one large JSON from all the separate JSON objects in the Array variable, as well as to save it on the Data lake itself.
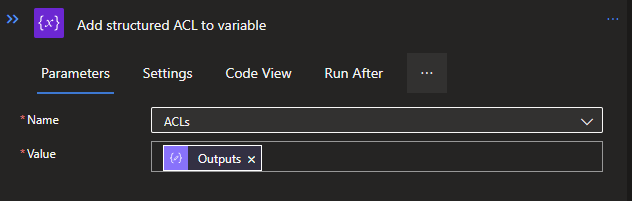
To start with, we create a new Compose Data Operation below and outside the For Each loop. The Compose contains a very straightforward piece of JSON code, which is as follows:
{
  "body": @{variables('ACLs')}
}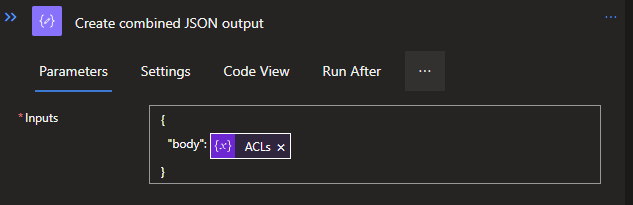
Since all the JSON objects are still separate in the Array, the above structure will add them to one large JSON body and the results in the below results:
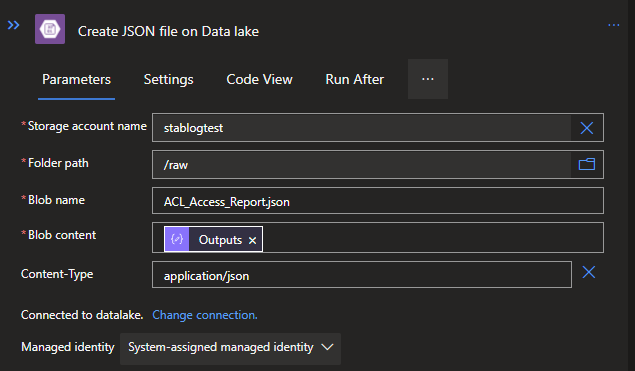
Now the only thing left is is to save the JSON on the Data lake so it can be picked up by another process. For this, we need to use the Create Blob V2 action from the Azure Blob Storage connector.
Since the MSI is in place for the Azure Logic App and a Data Lake Gen2 is fundamentally an Azure Storage account, we can also use this for our connection to save our JSON file.
Setup the connection via MSI when asked to configure and use the following options:
Storage account name: Your Data lake/ Storage Account name
Folder path: Container or folder where you want to store it
Blob name: YourFileName.json
Blob content: Output from the Compose
Via the Add a parameter option you can add Content-Type, in which you can specify application/json to make sure it will be seen as a JSON file.
With this, you will be done with the JSON part, but since we also want a .CSV, let's look at that next!
For Each loop (CSV part)
Inside the For Each loop, create another parallel branch below the Split IDs action in my example. In this parallel branch, we will be formatting everything to a CSV table-ready format and get it into an Array just like before.
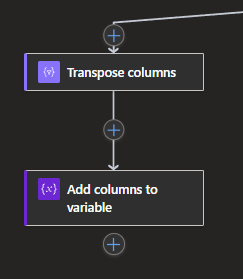
Start with creating a new Select Data operation, which we will use to format the data.
Use the Output from the Split IDs action, and you can use the following code to structure it:
{
  "1.1_Path": "raw/@{items('For_each_path')?['name']}",
  "1.2_Group": @{outputs('Get_ACLs_per_path')['headers']['x-ms-group']},
  "1.3_Owner": @{outputs('Get_ACLs_per_path')['headers']['x-ms-owner']},
  "1.4_Permissions": @{outputs('Get_ACLs_per_path')['headers']['x-ms-permissions']},
  "1.5_Permission-Type": @{if(equals(item()[0],'default'),item()[0],'access')},
  "1.6_ID": @{if(equals(item()[0],'default'),item()[2],item()[1])},
  "1.7_Permissions": @{if(equals(item()[0],'default'),item()[3],item()[2])},
  "1.8_Type": @{if(equals(item()[0],'default'),item()[1],item()[0])}
}
The numbers are used to allow a specific order of the columns, since JSON will automatically format it alphabetically, which we don't want it this case.
Like in the structuring of the complete JSON we did previously, we are using the same expressions here, but now we also use an IF-Statement to differentiate between the Default and Access ACL, since the Default had that one extra property.
![]()
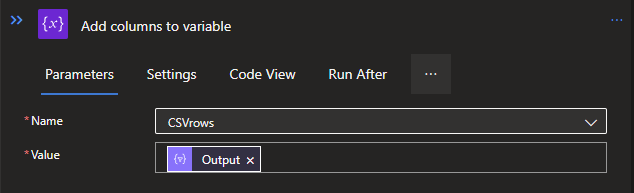
To carry it outside of the For Each loop again, we will need to add it to the previously created Array variable for the CSV. Again create an Append to array variable.
Use the Output from the Select as Value.
Saving to the Data lake (CSV part)
Also, the CSV will need to go to the Data Lake, which we will need to convert to a CSV table first, and then we can actually store it on the Data Lake itself, just like the JSON.
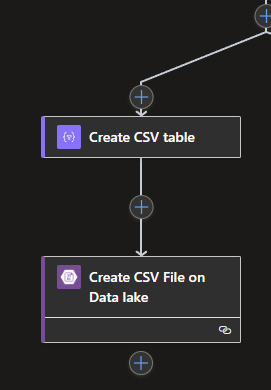
Create a parallel branch below and outside of the For Each so that the CSV part will be processed at the same time as the JSON part. Create a new action from the Data operation connector called Create CSV table. The From will need a bit of dirty code to structure the Array variable to a proper Array which the Create CSV table can process.
The code is as follows:
Json(replace(replace(replace(replace(replace(replace(string(variables('CSVrows')),'[{',''),'}]',''),'["','[{'),'"]','}]'),'\',''),'"",""','"},{"'))This will turn the different Array lists inside of the Array variable to one single Array, which is readable for the Create CSV table action.
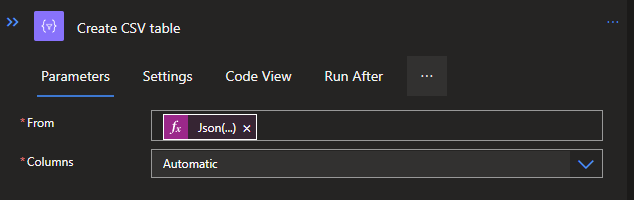
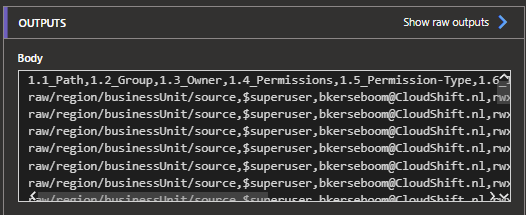
To clarify it a bit more, it will now look like a proper CSV:
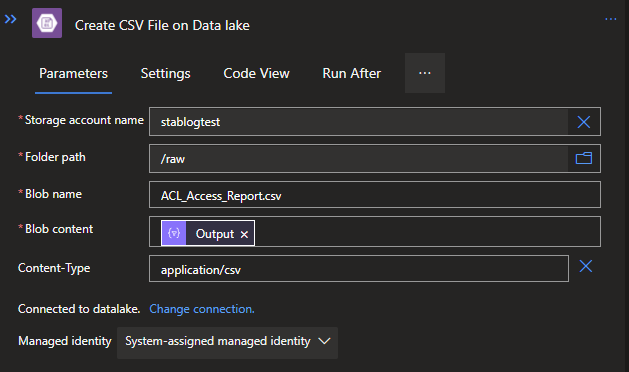
Last but not least, we also need to save it to our Data lake by using the same Action and options as before, but now with .csv as an extension for both the Blob name and the Content-Type.
Completed Logic App
The completed logic app will look as follows:
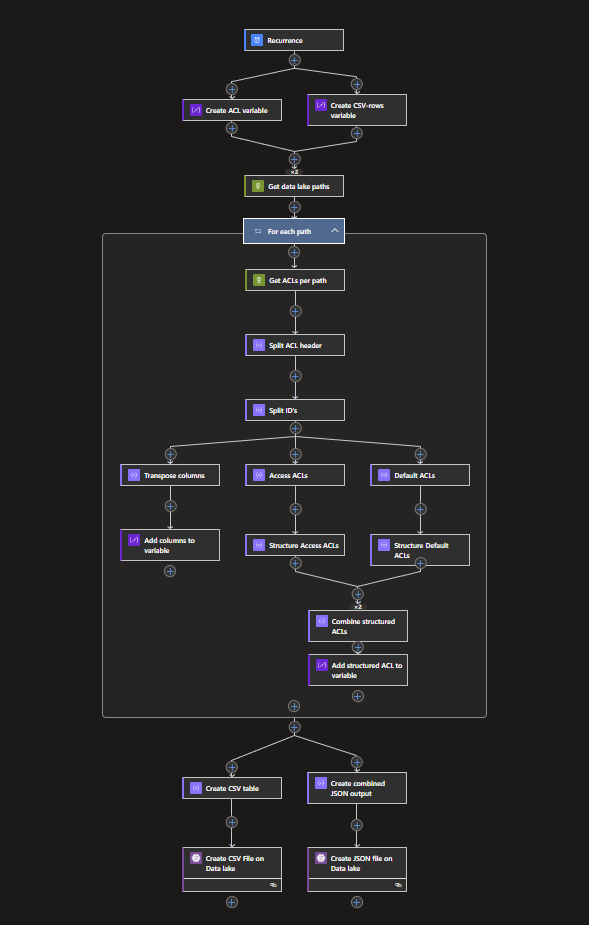
With this, we automated the process of checking our ACLs and created two files to use, both a JSON and a CSV file.
An important note will be that AD Groups with ACL rights will be shown as IDs, which might need a few extra steps in order for them to get proper names, but this might be a nice addition for the future!
What's next?
I'll be a bit busy next week, but I'm sure to work more with Bicep! Stay tuned!