
Getting started
In the latest episode of the workplacedudes I was one of the guestspeakers and talked about how to combine Azure Logic Apps with OpenAI's ChatGPT to promote your content by letting it write a great promotion text for your different socials. The idea behind it was to enhance one of my previous blogs with some AI. Check out the episode and use this blog as your guide.
Without further ado, let's start automating your content posts!
The Logic App
In this example I will be using the blogsite of Engin from the workplacedudes, but you can use any site that allows for an RSS feed. While still an older mechanism, it can almost be embedded in any site and is nothing more then a styled XML document which gets updated once in a while.
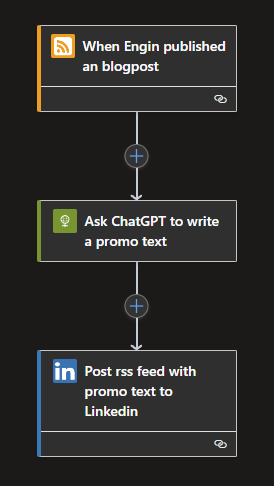
Each Logic app starts with a trigger, in this case to trigger on Engin's RSS feed. Search for RSS and you will find the trigger called When a feed item is published. Click on it and you will need to fill in some required data:
The RSS feed URL: {yourdomain.com/feed}
Chosen property will be used to determine which items are new: PublishDate
How often do you want to check for items? 30 Minute (Anything less will not work as it will always check once per 30 minutes)
If you click on Add new parameter, you can selected a Time zone.
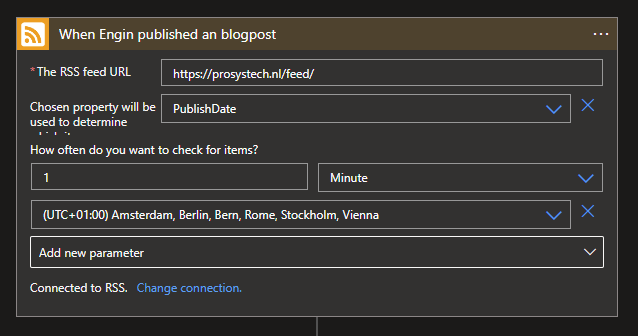
Now we will need an action to ask ChatGPT to write our promotional text, for this search for the HTTP Request Connector and choose the HTTP option. Use the following options:
Method: POST
URI: https://api.openai.com/v1/chat/completions
Headers: Authorization: Bearer {OpenAI API Token}, Content-Type: application/json
Body:
{
  "messages": [
    {
      "content": "Write a promotional text based on the content of: @{triggerBody()?['primaryLink']}, end the promotion with hashtags based on the content, exclude any urls.",
      "role": "user"
    }
  ],
  "model": "gpt-3.5-turbo"
}
With the HTTP Request in place we can now move towards posting the promotion content from ChatGPT to social media, in this case Linkedin.
Click on the + and choose Add an action and look for LinkedIn v2 and click on the Share an article V2 action.
Setting up a connection with a LinkedIn account is required. For this, I used my personal account. When the connection is set up you will be able to fill in some required data:
Content URL: Click on the field and choose the Primary feed link from the RSS connector. This is the URL to the details of the update.
Visible to guest: Click on the field and choose Yes. This will allow everyone to see your shared article instead of only your connections.
Click on Add new parameter and select Title, Description and Text.
Title: Click on the field and choose the Feed title, which is the name of the update.
Description: Click on the field and choose the Feed Summary which contains a short introduction text to the update.
Text: Click on the field and continue by clicking on the Expressions tab. You can use the Expression below to get the content from the HTTP Request:
first(body('Ask_ChatGPT_to_write_a_promo_text')?['choices'])?['message']?['content']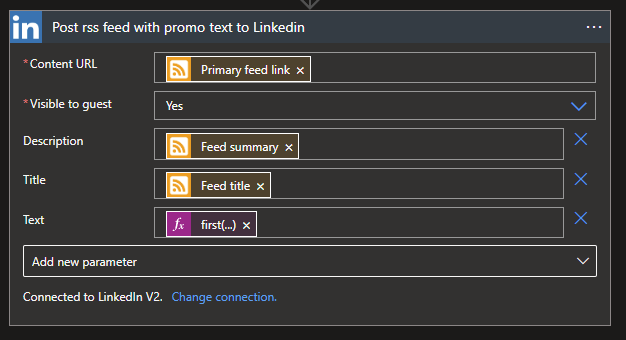
With everything now in place, post you latest content and let ChatGPT do all the work! Of course you can always customize the message you send to ChatGPT, to get it writen in a certain style, with emojis and more!
What's next?
A lot of different subjects have past me in the last few weeks and still have to see for which I can create a new solution out of. So stay tuned for the next blog!